
The pipe for Red Smoke was Maya, Unreal, Houdini, Nuke, and finally, Davinci and I knew I wanted to solidify the colour aspect of this. Maya was ignored from this workflow and I concentrated on Unreal, Nuke and Davinci.

I’m not going to pretend I know all about ACES and the workflow, I spent hours reading guides and watching tutorials. This is an amalgamation of the workflow. The process that once I set it up I didn’t think about it again. Once you have found your ACES profile, download it and place it on your machine, somewhere central, and then point everything ACES to that, easy…

Once saved to a nice easy-to-find location on disk you can start to reference that into Nuke and Unreal. Nuke ships with robust colour options but having both Nuke and Unreal setup with the same profile meant I would be able to match my renders in either program.

In Nuke’s preferences, you can set the OCIO to custom and point the path to your OCIO, and ACES profile and that’s Nuke setup and ready to go. Every Nuke file going forward now will be set to the ACES 1.2 OCIO profile and hopefully never really have to mess around with the settings. Nuke also gives you a list of all the spaces you can choose, pretty handy reference.

In Unreal, you need to make a OCIO configuration, think of it like the Nuke preferences, you point the path to your ACES profile on disk, and the select the spaces in which you want to work in.

The setup, is rendered in Linear sRGB space and viewed in Rec709 space. The Rec709 is the space I would be rendering from Nuke into DaVinci using and the ACEScg is the space I would be reading in the renders in Nuke via the reader node.


The colour spaces in both Unreal and Nuke. Pretty much identical and definitely working well. Once this was sorted, the last thing was to be able to render out from Nuke and import into DaVinci and have the renders match.

The export process worked like this, on the write node, select ACEScg in the output transform and hit render. This would make sure my renders were output with the correct colour profile ready for DaVinci Resolve.
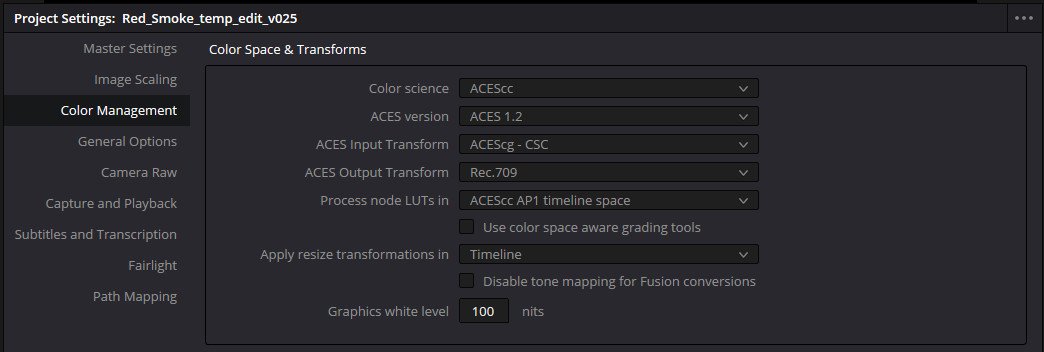
In DaVinci Resolve, go to the Project Settings and into the Colour Management tab. In here can select the correct colour space options that match both Nuke and Unreal. Once this is sorted, every render you import going forward will receive the correct colour Look Up Table, which is ACEScg when importing and viewing and then Rec709 when rendering out the final version to be uploaded or sent out.

Unreal Colour Display

Nuke Colour Display

DaVinci Colour Display
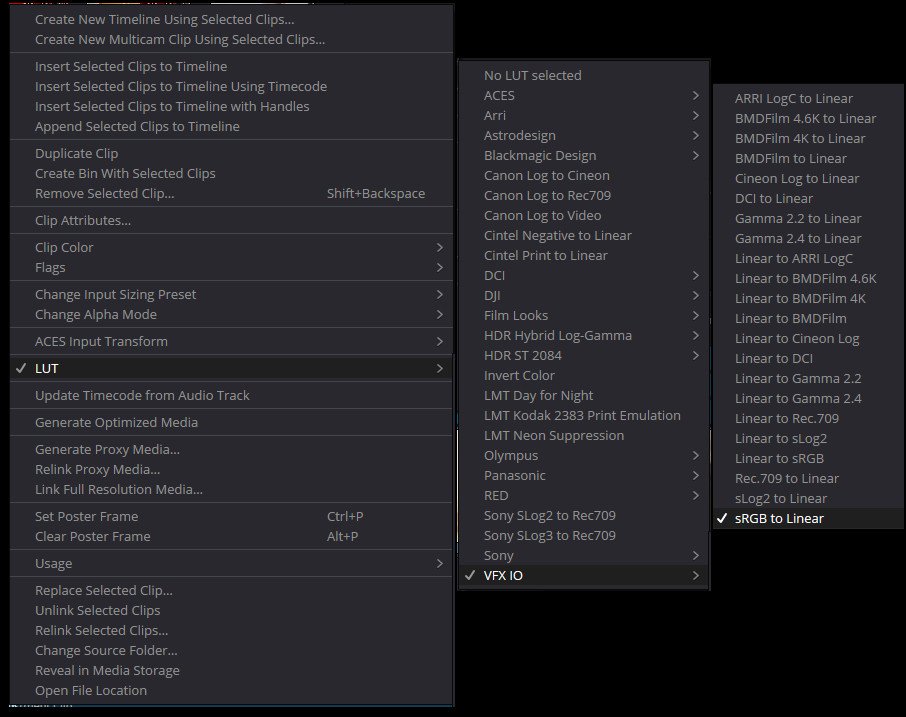
Not everything in my edit came from Nuke, the poster had passed from Nuke but it was all put together in Gimp. This meant I needed to manually change how the image was brought into DaVinci. Simply right click the file/clip in the media pool, head to LUT, then down to VFX IO and finally select sRGB to Linear. Your image will now be set correctly.

ACEScg LUT
Linear LUT
DaVinci will treat every image/clip brought into the project as an ACEScg render, which will be correct for all of our renders but not correct for anything made in an image creation software like Gimp or Photoshop. Manually switching the colour space will fix this and when rendered, it will receive the Rec709 space and it will match the rest of clips in the timeline.

I recommend reading through and rereading the colour information on the Unreal site, I used that to extract this workflow and referenced it heavily. Well worth a read with a cup of tea, definitely bookmark it.